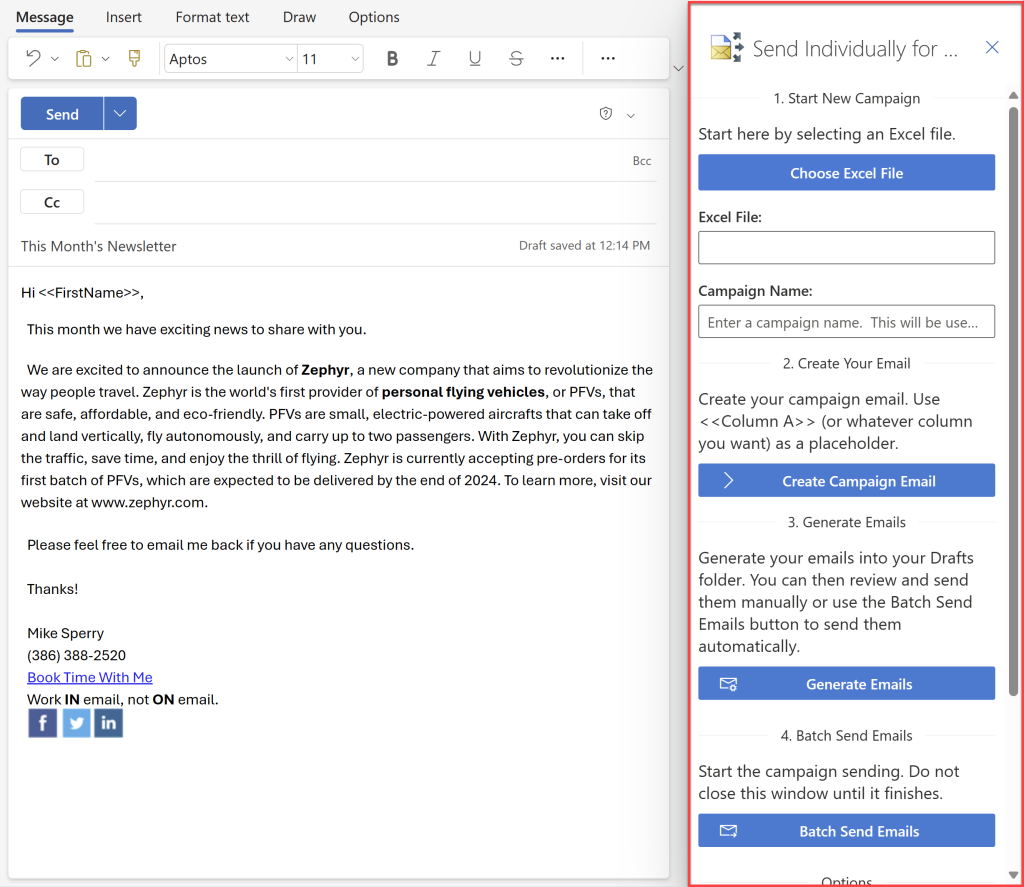
1) Choose an Excel File:
The first step is to Choose an Excel File. The Excel file is a list of your clients and/or customers, one per row, where the To column is first and has the email address a column of To addresses, one per row. Other columns can be substituted into the subject or body of the email, but this is the most important one, since the add-in needs to know who to send each email to. Once you choose your Excel file, give your campaign a name. This name is used internally to identify your campaign email going forward. If you don’t have an Excel file already, you can start by downloading this campaign template Excel file and begin filling the rows with your customer and clients.
2) Create Your Campaign:
The next step is to click on the Create Your Campaign button. This does two things: it registers the campaign email by connecting to your email account and also sets the To recipient to be the name of the Excel file. This way, you can’t accidently click the Send button as Outlook will not recognize the email address. It also internally stamps this particular email with an ID so that if you stop sending your campaign for any reason, then the add-in will know that this is the main campaign email so you can resume sending. More about this below.
From here you can go on to compose your email the way you want (assuming you haven’t already).
To personalize your email, in either the subject or the body, simply use <<Column B>> or <<Column C>>, etc. Note that <<Column A>> is always the email address, so you only use that if you want the email address of your recipient in the subject or body.
For example, if your Excel file has your contact’s first name in column B, then you might start an email with “Hi <<Column B>>,”.
3) Generate Emails:
After your email is ready, the next step is to Generate Emails. Once you click this button the add-in begins to perform a mail merge using the email you just created and your Excel file. It generates one email for each row in your Excel file, provided the email address is valid. There is a small progress window that displays the generation process.
4) Batch Send Emails:
Once the emails have been generated you can start sending them by clicking the Batch Send Emails button. This starts the process of actually sending the emails, one at a time. By default, one email is sent every ten seconds to prevent overwhelming mail servers.
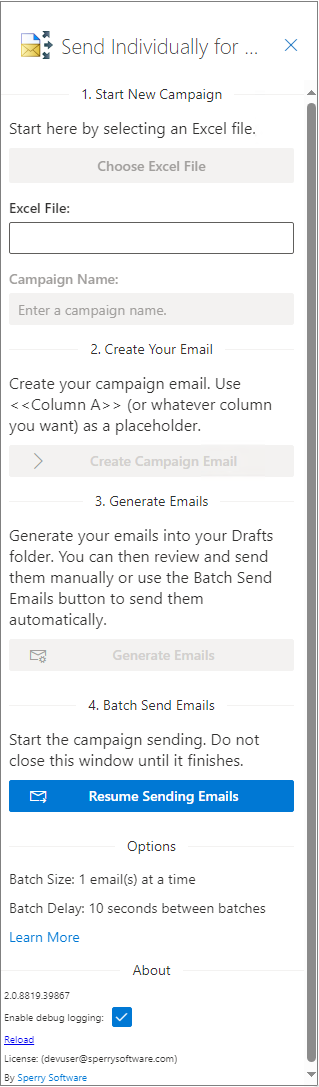 Once the sending process starts, do not close the email window. This is because everything takes place in your email account, and there are no other servers to perform this process.
While you must leave the email window alone as the batch send process continues, you could of course just open another tab and continue to work with your email (assuming you are setup to use Outlook on the Web). You could also simply navigate back to your main Outlook desktop window and work in Outlook from there (again assuming you popped the campaign email into its own window).
Note that if you do close the email window, or you wanted to check on the emails that were generated into your Drafts folder in Step 3, that you can simply go back to your original campaign email (the one with the Excel file as the To address). When you do, you’ll see that all the buttons are disabled; only the last button is enabled and retitled to “Resume Sending”. Clicking this button resumes sending the emails that are associated with this campaign. This way, you have complete control over starting and stopping the campaign.
Limitations:
The most important limitation is that Microsoft imposes a maximum send of 2500 emails in any 24-hour period. So, if you use this add-in to launch 3 campaigns in one day, each having the maximum of 1000 recipients, all in one day, you will be locked out of your email account and you will have to contact Microsoft support to reinstate your email account.
The second most important limitation is that the add-in will not send more than 1000 emails in a campaign. Even if your Excel file has more than 1000 rows, they will be silently ignored. Future versions will make it more obvious that the extra rows will be ignored.
Another important limitation is that as mentioned, the add-in throttles the sending rate to 1 email every 10 seconds. This means you can send a maximum of 6 emails/minute, or 360 emails/hour. A full campaign of 1000 recipients will take about 3 hours.
Many people ask if there is any kind of dashboard or statistics to see how many people have opened or even read the email. The answer is not yet, but we are working on this!
Tips:
Start small! Create an Excel file that has your email address in the first row of the first column, followed by your first name. Then in the next row add another test email addresses, followed by the recipients first name. Maybe add one more row.
Then experiment with this Excel file. Currently the Excel file name cannot have punctuation or spaces (other than a dash).
Once saved, experiment by using this Excel file to become comfortable with how it works, your desired personalization, and possibly your ability to navigate away from the sending and resuming it later.
After you have examined what the emails look like (presumably by looking in your Sent Items folder or by accessing your test email Inboxes), then you can begin experimenting more and more, and crafting an email that grabs your user’s attention.
In this way, you’ll be well on your way to getting the word out and growing your business!
Need more help? This guide to Getting Help For Office 365 Apps is useful if you’re having trouble installing or running the add-in.
One final note: If you or your company is interested in getting a customized version, please get in contact with us for pricing and to discuss options. We have created versions for other companies that change the sending rate, the delay between sends, delivery/read receipts, and more.