

How to Use Groups to Assign Rules Selectively
Using Groups to Manage Email Rules for Teams
Safeguard Send for Microsoft 365 gives IT administrators fine-grained control over which warning rules apply to users in their organization. By default, all users in a company share the same domain-level rule set. But what if different teams in your organization need different rules? That is exactly what Groups are designed to solve.
Why Groups?
Consider David Jones, the IT Manager at Arbor Software. Arbor has two very different types of employees who send email:
- The Finance team handles sensitive financial data and needs strict rules — every external recipient must be confirmed individually before an email can go out.
- The Sales team sends high volumes of outbound email to external contacts all day long and would find those same strict rules disruptive to their workflow.
Without Groups, David would have to choose one rule set that applies to everyone. With Groups, David can create a “Finance” group, assign all Finance team members to it, and give that group its own tailored rule set — completely independent of the Sales team or anyone else in the company.
How Groups Work
Every user in your organization falls into exactly one of the following categories, evaluated in priority order whenever a user clicks Send:
- Individual rule set — the user has their own personal rules configured. These take highest priority.
- Group rule set — the user is a member of a group that has its own rules.
- Domain rule set — the company-wide default rules apply. This is the fallback for anyone not in a group and without individual rules.
A user can only belong to one group at a time. If a user already has an individual rule set configured, they cannot be added to a group until that individual rule set is removed first.
Creating a New Group
To create a group, navigate to your Safeguard Send Dashboard and locate the Rule Sets section on your subscription home page.
- Click the Create New Group button (shown in red).
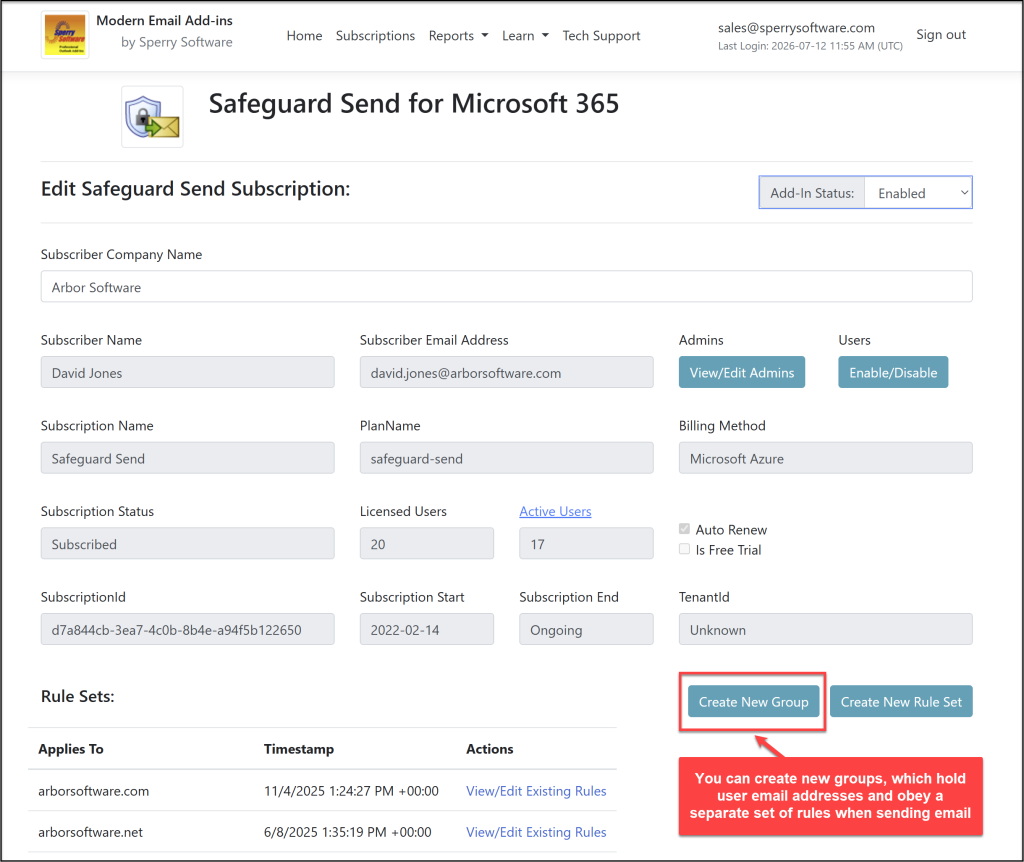
- Click the Create New Group button (shown in red).
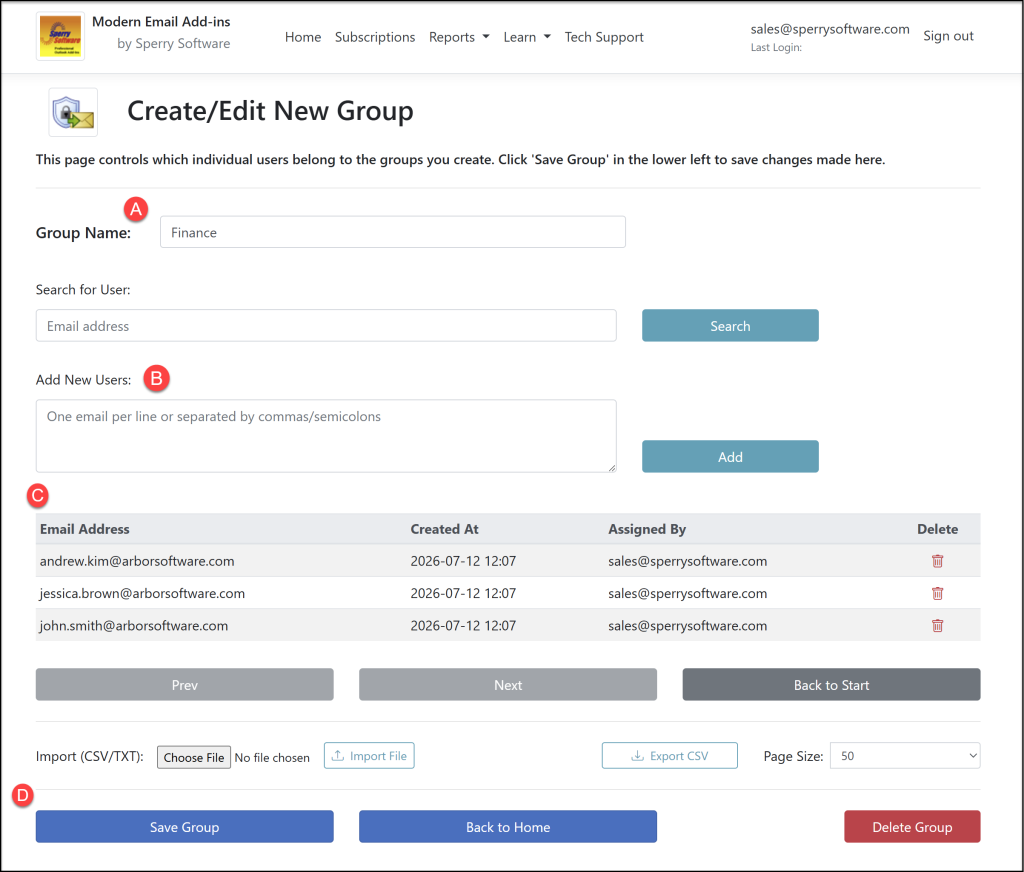
- Enter a Group Name in the field provided (A). This name must be unique within your subscription and cannot be changed after the group is created. Choose a descriptive name that reflects the team or policy, such as Finance or SalesTeam.
- Optionally Add Users (B), one email address at a time (but see below for more ways to add users).
- Members that belong to the list appear in the table (C).
- Click Save Group to create the group (D).
Example: Setting Up a Finance Team Group at Arbor Software
- David logs in to the Safeguard Send Dashboard.
- He clicks Create New Group and enters the name Finance:
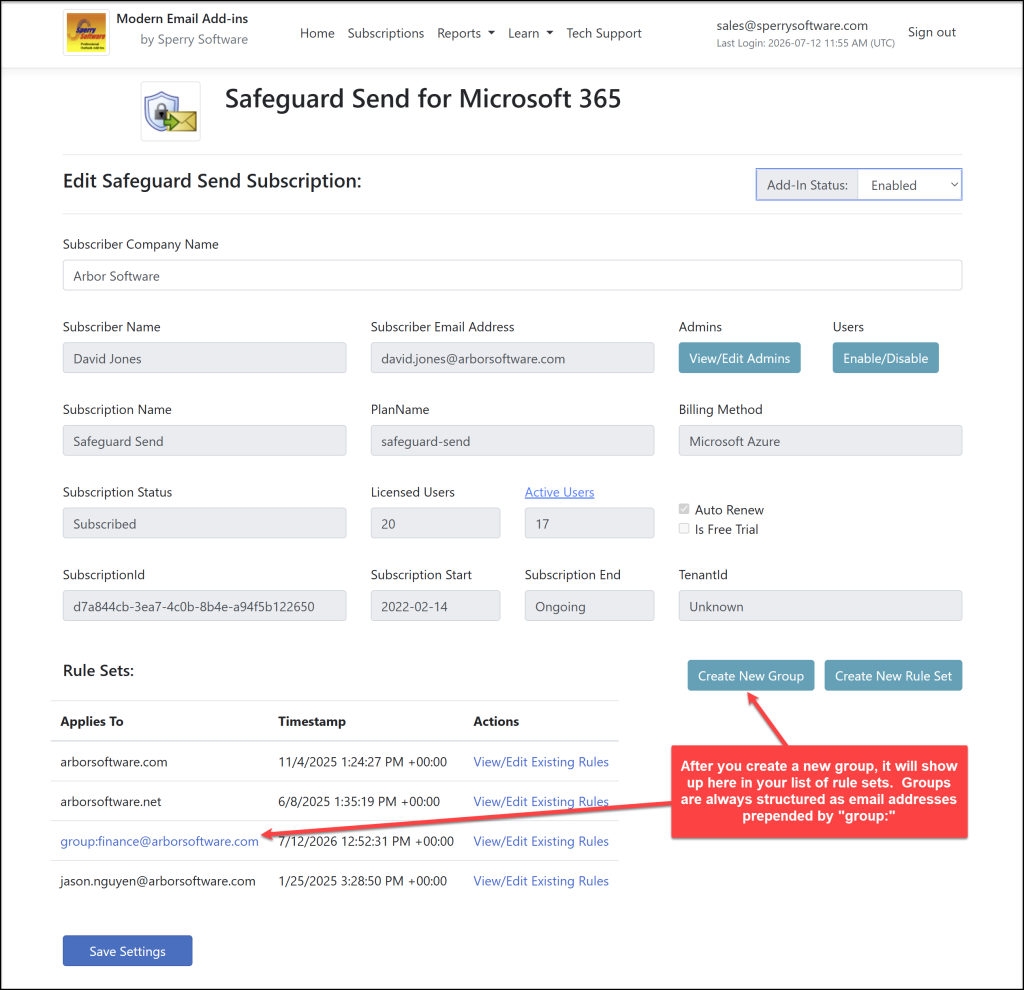
- The group is created and seeded with Arbor Software’s existing domain rules.
- David clicks View/Edit Existing Rules next to the new Finance group and adds stricter rules — specifically, a rule requiring confirmation of every external recipient before sending.
- David returns to the dashboard, clicks the group:[email protected] link, and uses the Add New Users text area to paste in the email addresses of all 12 members of the Finance team.
- He clicks Add, then Save Group.
- From that point on, whenever any Finance team member clicks Send, they see the stricter confirmation prompts — while everyone else in the company continues using the default (domain based) set of rules.
Note: The group will appear in your Rule Sets list using the format group:[email protected]. This is the internal identifier for the group and is a normal part of how the system works. Adding Members to a Group
Once you have created a group (or when editing an existing one), you can add members using two methods:
Search and Add One at a Time
- In the Search for User field, type the email address of the user you want to add.
- Click Search to confirm the address.
- The user will appear in the member list below. Click Add to confirm.
Bulk Add
- In the Add New Users text area, enter one email address per line, or separate multiple addresses with commas or semicolons.
- Click Add to add all addresses at once.
Import from CSV or TXT File
If you have a large number of users to add, you can import them from a file:
- Click Choose File next to the Import (CSV/TXT) label.
- Select a
.csvor.txtfile where each line contains one email address. - Click Import File to load the addresses into the group.
You can also click Export CSV at any time to download the current member list as a spreadsheet for your records.
Removing Members from a Group
To remove a user from a group, locate their email address in the member list and click the red trash icon in the Delete column on that row. The user is removed immediately and will fall back to domain-level rules the next time they send an email.
Editing an Existing Group
From your dashboard home page, groups appear in the Rule Sets list alongside your domain and individual user rule sets. A group row is identifiable by its group: prefix in the Applies To column and is displayed as a clickable link.
- Click the group name link to return to the Create/Edit Group page and manage the group’s members.
- Click View/Edit Existing Rules on the same row to edit the warning rules that apply to all members of that group.
Tip: Changes to group membership take effect immediately — the next time any member of the group clicks Send in Outlook, they will be evaluated against the updated group rules.
Deleting a Group
To delete a group entirely:
- Open the group by clicking its name in the Rule Sets list.
- Click the Delete Group button (shown in red at the bottom right of the page).
- Confirm the deletion when prompted.
When a group is deleted, all members of that group are removed from the group and will automatically fall back to the company domain-level rules. The group’s rule set is also deleted. This action cannot be undone, so make sure you have exported the member list and/or copied the rules if you want to preserve them.
Navigating the Group Page
| Button | Purpose |
|---|---|
| Save Group | Saves the current group name and all membership changes |
| Back to Home | Returns to the subscription dashboard without further changes |
| Delete Group | Permanently deletes the group and all its members |
| Prev / Next | Pages through the member list if there are more members than the current page size |
| Export CSV | Downloads the current member list as a CSV file |
| Import File | Loads email addresses from a CSV or TXT file into the member list |
Important Rules and Limitations
- A user can only belong to one group at a time.
- A user who already has an individual rule set cannot be added to a group until that individual rule set is deleted from the Rule Sets list first.
- A group name cannot be renamed after it is created. If you need to rename a group, delete it and create a new one with the new name.
- Users who are not in any group and have no individual rules will always use the company domain rules automatically — no action is required to set this up.
- Group rules are downloaded to the user’s Outlook client at the moment they click Send. Changes to group rules take effect immediately with no need to reinstall or update the add-in.
Example: Setting Up a Finance Team Group at Arbor Software
- David logs in to the Safeguard Send Dashboard.
- He clicks Create New Group and enters the name
Finance. - The group is created and seeded with Arbor Software’s existing domain rules.
- David clicks View/Edit Existing Rules next to the new Finance group and adds stricter rules — specifically, a rule requiring confirmation of every external recipient before sending.
- David returns to the dashboard, clicks the
group:[email protected]link, and uses the Add New Users text area to paste in the email addresses of all 12 members of the Finance team. - He clicks Add, then Save Group.
- From that point on, whenever any Finance team member clicks Send, they see the stricter confirmation prompts — while everyone else in the company continues
