Creating or Editing a Rule
When you click on the Edit/View Rules link in the Rule Sets page, you are brought to this page. IT is basically divided into two sections, one where you specify the triggers, or conditions, and below that an area where you specify the actions that the add-in will take if a condition was violated (usually a prompt, but there are other actions that can take place).
Conditions:
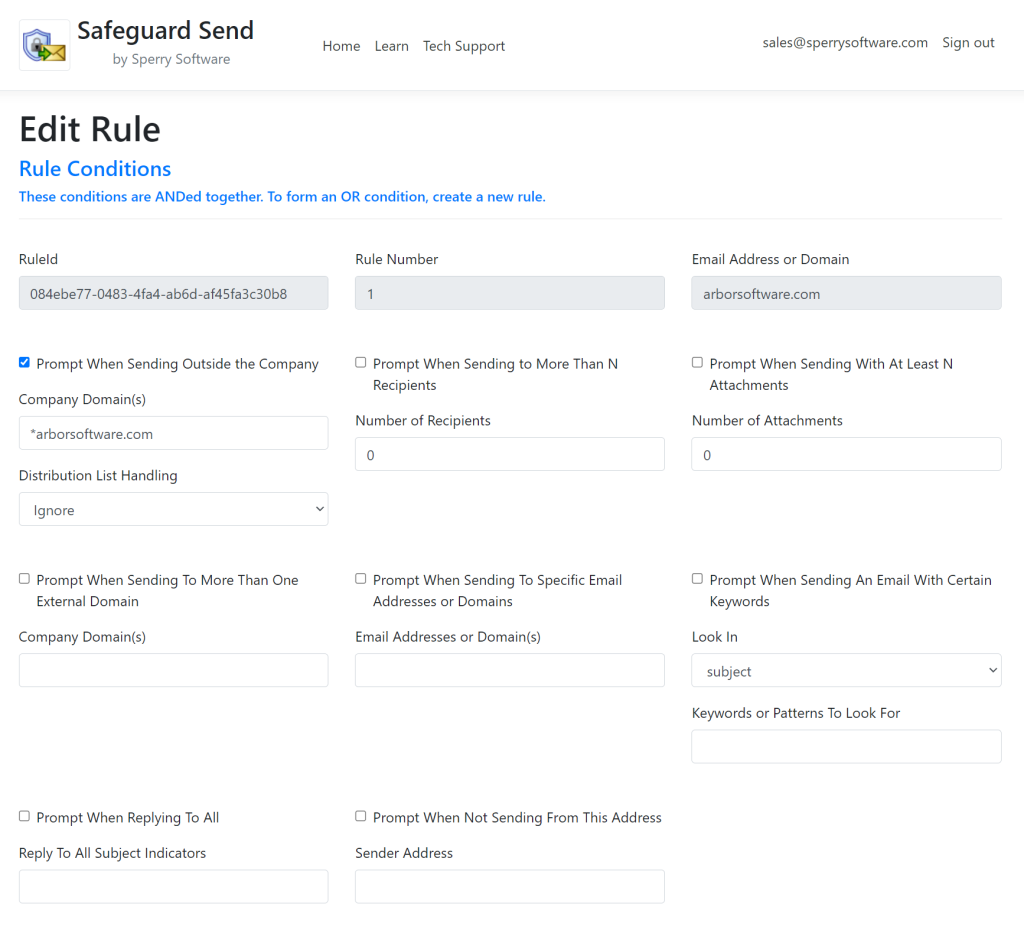
RuleId and Rule Number: Read only fields used to identify the rule.
Email Address or Domain: This rule applies only to the domain or email address listed here.
Prompt When Sending Outside the Company: This is by far the most common option, and is part of the rule created by default when you first sign up. Checking this box enforces that anytime there is an outgoing email with a recipient that is NOT in this list of domains, that the rule actions (usually a prompt that displays a warning) will occur.
Company Domain(s): This is the list of domains in your company, separated by commas (or semicolons). It’s useful to be able to specify more than one domain so that if you frequently reference recipients in a subsidiary or subdivision, then the add-in won’t treat those recipients as external to your organization. For example, David Jones, the IT Manager at Arbor Software, might put “*arborsoftware.com, *arboroperations.com” in that field to prevent the add-in from warning about external recipients when going to send an email to Jessica Brown, the Operations Manager at Arbor Operations. Note that the wildcard character at the beginning of each domain is required.
Distribution List Handling: Normally, when consulting the list of recipients the add-in considers each one in turn. It may be that one of the recipients is in fact a distribution list (DL). This option controls whether each member of that DL should be examined or not. The default is to “Ignore” any distribution lists for the sake of time, but “Process” could be selected in order to have the add-in examine each member and then warn if any of the members of the DL are outside the company domain(s).
Prompt When Sending To More Than N Recipients: Checking this box causes the add-in to count the number of recipients in the email and prompt (or otherwise act) if the number of recipients exceeds your value.
Prompt When Sending With At Least N Attachments: Similar to the Number of Recipients condition, this checkbox will cause the add-in to count the number of attachments and if the number of attachments exceeds your value, the add-in will prompt (or otherwise act).
Prompt When Sending To More Than One Domain: This is another popular rule condition that causes the add-in to consider the list of recipients and if there are any external recipients, that’s ok but if there are two or more external recipients and they are from different companies, then that causes the add-in to prompt. In other words, use this option to force users to send to one company at a time.
Company Domain(s): Similar to the Prompt When Sending Outside the Company option, this is the list of domains in your company, separated by commas (or semicolons). It requires a wildcard character at the start as well.
Prompt When Sending To Specific Email Addresses: This option causes the add-in to look for specific recipients or domains when sending an email. This could be useful to warn users when they are going to send an email to say, a hotmail.com, yahoo.com, or gmail.com domain. It can also be useful to warn users when they are going to send an email to a frequently mistyped email address, for example between [email protected] and [email protected].
Email Address or Domain(s): This the list of email addresses or domains to trigger on, separated by a comma (or semicolon). Any domains must be preceded with a wildcard character (an asterisk).
Prompt When Sending An Email With Certain Keywords: Choosing this option causes the add-in to prompt if the specified keywords are found in the email. This can be useful if sensitive or classified projects are being implemented, and emails referencing those secret projects is discouraged.
Look In: When the add-in is looking for certain keywords, it is necessary to decide whether to look in the subject, body, or both. This field lets you decide where the add-in should look for any keyword violations.
Prompt When Replying To All: With this option checked, after clicking Send the add-in will examine the email to see if a Reply To All was invoked (as opposed to a standard reply). If so, the add-in will warn the user allowing them to cancel the send operation and edit the list of recipients.
Reply To All Subject Indicators: This is the list of usual subjects of an email that has been replied to. Most commonly, “RE:” and “Re:”. The add-in uses this field to deduce that a reply has taken place.
Prompt When Not Sending From This Address: This option causes the add-in to examine the From address. If the From address does not match the specified one, then it prompts the user. This could be useful if you have another email account (say a personal email address) and sometimes send email from that address. This way, if you send to your corporate colleagues using your personal account, the add-in will catch it and warn you.
Sender Address: This is the main (or corporate) address that you normally send from.
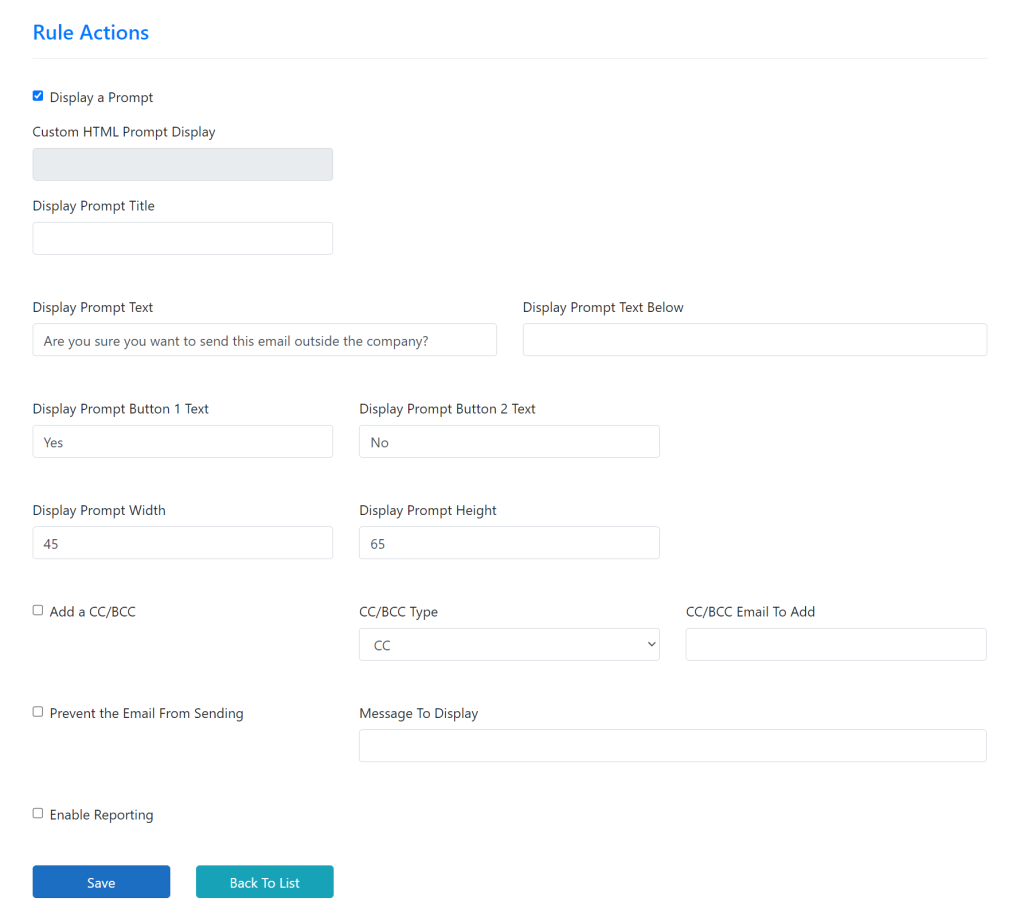
Actions:
In the lower half of the edit rule window, the available actions are displayed:
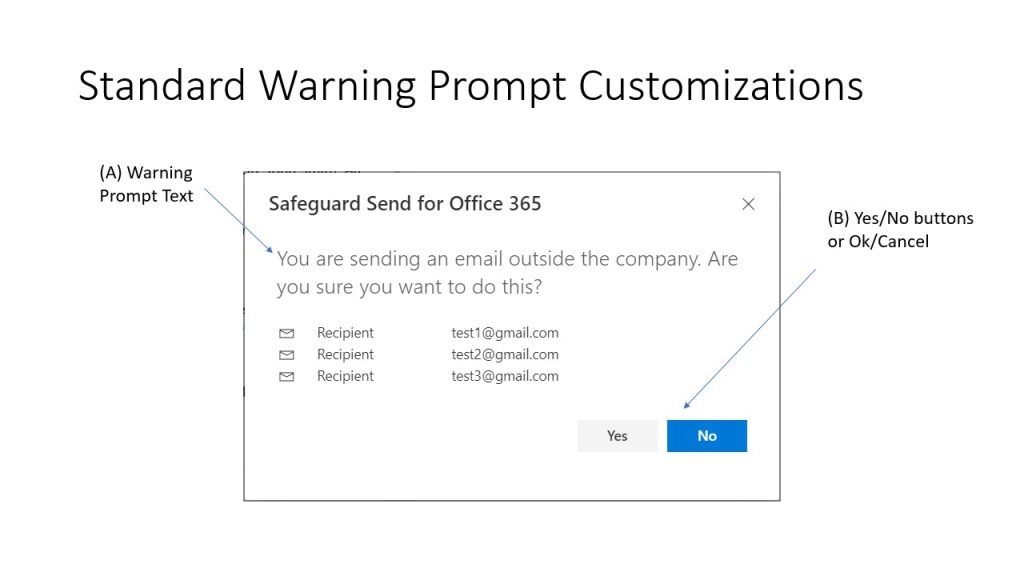
The add-in comes in two (paid) tiers, Standard and Pro. All the options are visible here, even though not all options have an effect on the prompt. The Standard prompt options look like this:
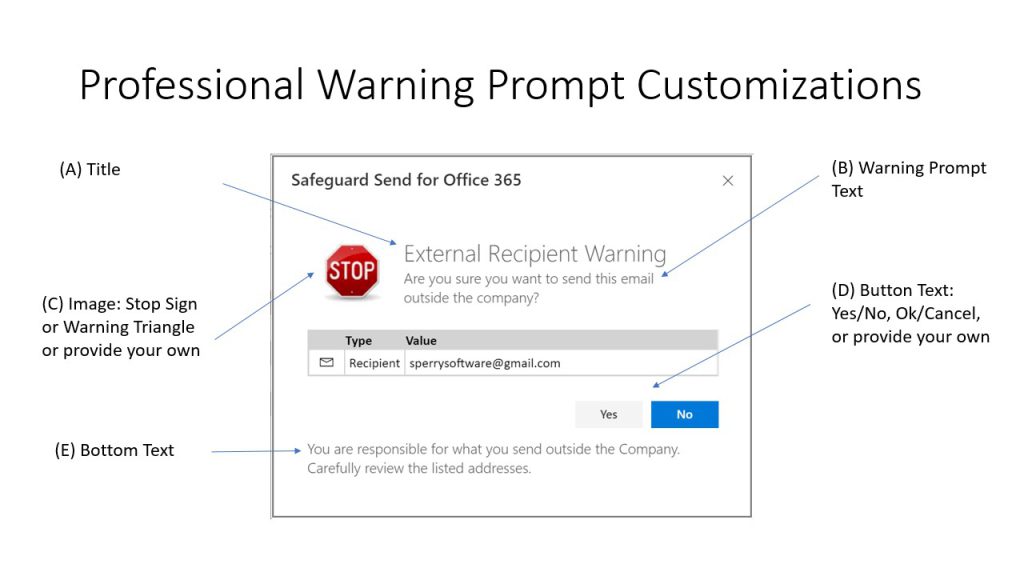
Similarly, the Pro version allows for these options, plus a few extra details:
Display a Prompt: This is by far the most popular action for the add-in to take, and is the default action when your first rule was created for you. It causes the add-in to display a prompt when the rule’s conditions are violated.
Custom HTML Prompt Display: Some customers have had exacting requirements when it comes to the display of the prompt, above and beyond even what the Pro version offers. If a value is present here, then it means that a custom display prompt will occur. In the future, this will be an editable field and you can create your own custom look and feel for the display prompt.
Display Prompt Title: This is the title (A) that you see in the Pro version of the display prompt. It can be useful to delineate between various rules using a descriptive title here.
Display Prompt Text: This is the main text shown to the user. It’s useful to customize this text to warn the user about which rule is being violated. For example, if David Jones, the IT Manager at Arbor Software, wants to warn his users about sending an external email versus when sending an email to more than one external domain, then he might use the text “You are sending an email outside the company. Are you sure you want to do this?” in the former case and “You are sending to recipients in more than one company. Are you sure you want to do this?” in the latter.
Display Prompt Text Below: This area is useful for any additional information you want to impart to the user. Sample phrases can be similar to “You are responsible for what you send outside the company.” and/or “Carefully review the list of addresses.” Phrases like this can help to impart a more serious tone to the end users, or to provide additional details like a link to corporate privacy policies.
Display Prompt Button 1 Text: This area is for the “positive” button text – that is, Yes, Ok, or even Send.
Display Prompt Button 2 Text: This area is for the “negative” button text – that is , No, Cancel, or possibly Revise.
Display Prompt Width and Display Prompt Height: Sometimes if a lot of text is used in the title, main prompt text, or the bottom area text, it may be necessary to make the prompt larger. These two values can be used to accomplish this. The values may require a bit of experimenting, so it is probably best to test your rule first before rolling it out company wide.
Add a CC/BCC: In addition to optionally displaying a prompt, other actions can be performed if there is a violation of rule conditions. In this case, a CC or BCC recipient can be automatically added. Note that even if a BCC is chosen here, that the BCC email address will be visible to the end user if they go into their Sent Items and look at the email that was just sent.
CC/BCC Type: This is where you choose what type of additional recipient will be added, either a CC or a BCC address.
CC/BCC: This is the actual additional email address to add to the email list of recipients.
Prevent the Email From Sending: Checking this box stops the email from being sent if the rule conditions were violated. While normally the add-in allows a Yes/No (or Ok/Cancel) and if the Yes (or Ok) button is clicked then the email goes out. However when this option is selected, the email will not send.
Message To Display: This is the message displayed when the Prevent the Email From Sending option is checked. Because there may be no prompt associated with this rule, the text here will show up as a tooltip in the body of the email. The default text is “Safeguard Send is active for your protection and for the prevention of unauthorized disclosures.”. Here is what it looks like in Outlook, as an attempt to send to a Gmail address is stopped:

Enable Reporting: This is a future feature. We intend to allow you to choose to have the add-in record whenever a condition is violated, the action taken (including the text of any prompt), and most importantly the user’s response (Yes/Ok or No/Cancel). In the future, we will add a page to your dashboard to allow you to peruse this list of users, the prompts presented, and the user’s actions so that you can verify that a user was prompted and yet they still chose to send the email in question. We have enabled this feature so that you can begin collecting the data now instead of waiting for the associated web page to be built. The default is off.